Lemon Bars Recipe
This Post May Contain Affiliate Links. View Disclosure Policy For Details.
This recipe for lemon bars combines a buttery crust with a smooth, tangy lemon filling that makes them impossible to resist. The crunchy base and creamy topping are a perfect match. While they’re a holiday favorite, these classic treats are amazing any time of year.
Don’t let making lemon bars from scratch scare you – this recipe makes it super easy. The result is homemade lemon bars that taste way better than store-bought ones. With basic ingredients and simple steps, you’ll make a dessert that disappears fast at any gathering.

I always make these lemon bars when I need a dessert that looks fancy but isn’t hard to make. The smell of them baking takes me back to my grandma’s kitchen – that mix of butter and fresh lemons is just amazing.
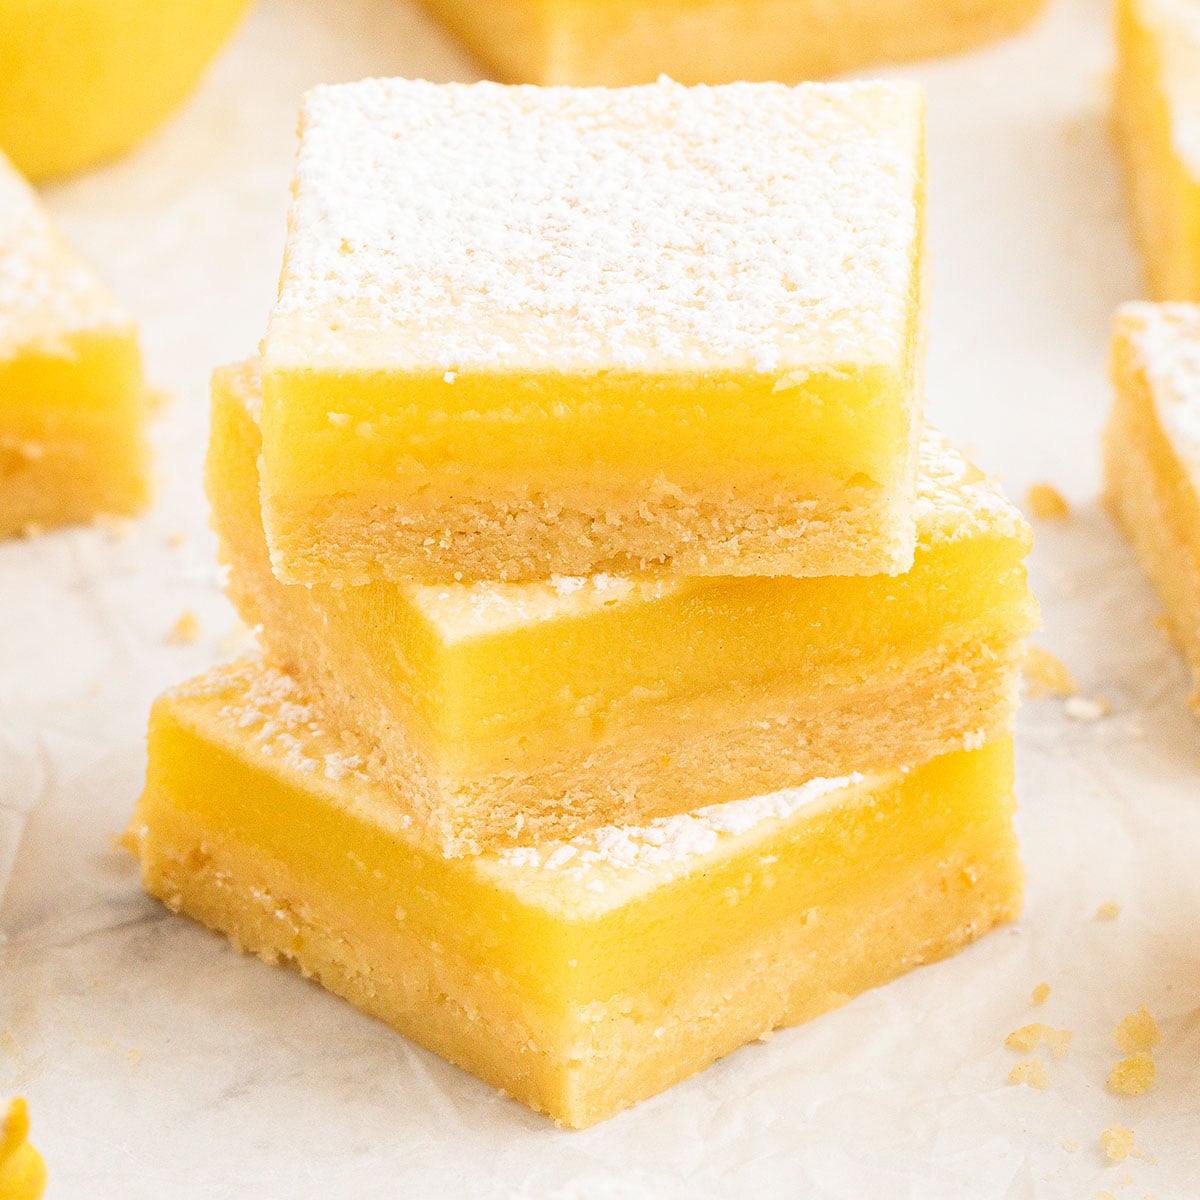
The powdered sugar on top isn’t just for looks – it adds the perfect touch of sweetness to balance out the tangy lemon. I like to dust them right before serving so the sugar stays bright white and pretty.
Sometimes I’ll add a little extra lemon zest to the crust if I want them extra zingy. That’s the nice thing about this recipe – you can adjust the tang to your taste by adding more or less zest!
During the holidays, I serve these on a pretty platter, and in the summer, I sometimes pop them in the freezer for about 30 minutes before serving so they’re extra refreshing.
We love dessert bar recipes from strawberry cheesecake bars to chocolate peanut butter oatmeal bars, and cranberry lemon bars, because they are delicious and easy to make and take anywhere.
Ingredient Notes
See the printable recipe card below for all ingredients, specific measurements, and complete instructions.

- Unsalted butter: Make sure it’s softened to room temperature before starting. This helps it mix smoothly with the other crust ingredients. If you only have salted butter, that’s fine – just skip adding any extra salt to the crust.
- All-purpose flour: Regular all-purpose flour works great for both the crust and filling. For the lightest texture, measure by spooning the flour into the measuring cup rather than scooping directly from the bag.
- Fresh lemons: You’ll need both the juice and zest. Fresh lemons make these bars taste amazing, but bottled juice works in a pinch. From a medium-sized lemon, you typically get about 3 tablespoons of juice and 1 tablespoon of zest.
- Eggs: Large eggs at room temperature work best. Take them out of the fridge about 30 minutes before you start baking. The filling needs both whole eggs and extra yolks for the perfect smooth texture.
- Granulated sugar: Regular white sugar works perfectly in the crust. For the filling, superfine sugar dissolves more easily, but regular granulated sugar is fine too.
- Powdered sugar: This is for dusting the tops of the bars. Don’t dust them until you’re ready to serve, as the sugar can dissolve into the filling if the bars sit too long.
How To Make Homemade Lemon Bars
First, preheat your oven to 350°F. While it heats up, prepare your baking pan. Spray a 9×13-inch pan with cake release, then line it with parchment paper, making sure the paper extends about an inch above the sides of the pan. This extra paper acts as handles to lift out your bars later.


Now for the crust. Add your softened butter, granulated sugar, flour, and lemon zest to a mixing bowl. Mix with a paddle attachment on low speed until the mixture looks like breadcrumbs and starts coming together into a ball. Spread this mixture into your lined pan, pressing it down with your fingers to create an even layer.


Next, smooth out the crust. Place a piece of parchment paper on top and press firmly with a cake smoother to flatten the surface. Remove the paper and poke the crust all over with a fork. Slide it into the oven and bake for 18-20 minutes until it turns golden.
While the crust bakes, make your lemon filling. Clean out your mixing bowl, then whisk together the flour and sugar. Add in your eggs, egg yolks, and lemon juice, mixing until everything combines smoothly. For the silkiest texture, strain this mixture through a sieve into a jar.


Once the crust is done, reduce the oven temperature to 320°F. Pour your strained lemon mixture over the warm crust, then return the pan to the oven for another 20-25 minutes. You’ll know it’s ready when the filling doesn’t wobble when you gently shake the pan.
Let the bars cool completely on a rack before moving them to the refrigerator. When you’re ready to serve, use the parchment paper to lift the entire dessert out of the pan. On a cutting board, trim the edges with a hot, sharp knife. Mark out 24 even squares, then cut through cleanly, wiping your knife between cuts. Dust generously with powdered sugar just before serving.

Substitutions and Variations
- Switch to lime. Swap the lemon juice and zest for lime to make bright, tropical bars. The process stays exactly the same.
- Use Meyer lemons. These special lemons create sweeter, less tangy bars. They’re perfect if you want a gentler citrus flavor.
- Make them gluten-free. Replace the all-purpose flour with your favorite 1-to-1 gluten-free flour blend in both the crust and filling.
- Try orange zest. Add orange zest to the crust instead of lemon for a different citrus twist. You can still use lemon juice in the filling.
Make Ahead, Storing, and Freezing
Make Ahead: You can prepare these lemon bars 1-2 days before you need them. Store them in the refrigerator, and wait to dust them with powdered sugar until serving time. They’re perfect for preparing ahead for parties or holiday gatherings.
Store: Keep your lemon bars in an airtight container in the refrigerator for up to 3 days. When stacking them, place a sheet of parchment paper between layers to prevent sticking. Add the powdered sugar topping right before serving, as it tends to dissolve in the refrigerator.
Freeze: Place the cut bars in an airtight container, separating layers with parchment paper. They’ll keep in the freezer for up to 2 months. When you’re ready to enjoy them, thaw them overnight in the refrigerator. Remember to add a fresh dusting of powdered sugar before serving.
Lemon Bars Recipe Tips
- Double line your pan with parchment paper, leaving extra hanging over the sides. This creates handles that make lifting the bars out super easy.
- Strain the lemon mixture before pouring it onto the crust. This step takes just a minute but makes your bars silky smooth without any lumps from the eggs or flour.
- When cutting the bars, dip your knife in hot water and wipe it clean between each cut. This keeps your cuts clean and prevents the filling from sticking to the knife.
- Bake your lemon bars at a lower temperature when adding the filling. This helps prevent those pesky air bubbles from forming on top.
- Let the bars cool completely at room temperature before moving them to the fridge. This gradual cooling helps prevent cracks in the filling.
- Keep the baked crust warm while you prepare the filling. If the crust cools too much before you add the filling, the layers might separate after baking.
- Always mix the filling ingredients just until combined. Overmixing can add air bubbles that will show up on the surface of your bars.
Why are there air bubbles on top of my lemon bars?
Air bubbles are normal and can be tricky to avoid completely. However, you can minimize them by reducing the oven temperature to 320°F when baking the topping. Also, try to avoid whipping air into the mixture when you blend the topping ingredients together.
What is the key to a perfect lemon bar texture?
For a smooth lemon bar topping, strain the lemon mixture over the crust to remove any lumps. Using a hand blender will also help break up any lumps in the mixture before straining.
Can I use bottled lemon juice?
Yes, you can use bottled lemon juice if you don’t have fresh lemons. While fresh lemon juice will give you the best flavor, bottled juice works in a pinch for making delicious lemon bars.

This lemon bars recipe has been in my family for years, and for good reason. The buttery crust and smooth, tangy filling make the perfect pair, and that dusting of powdered sugar adds just the right finishing touch. You’ll be surprised how simple it is to create these classic bars in your own kitchen – just follow the steps, and you’ll have a dessert that brings smiles to everyone’s faces.

Lemon Bars Recipe
Ingredients
Crust
- 1¾ sticks unsalted butter, softened
- ½ cup granulated sugar
- 2½ cups all-purpose flour
- grated rind from 2 lemons
Lemon Curd Topping
- 2 cups superfine sugar
- ½ cup all-purpose flour
- 5 large eggs
- 3 large egg yolks
- 1 cup freshly squeezed lemon Juice
- powdered sugar for dusting
Instructions
- Preheat the oven to 350°F.
- Spray a 9 x 13” pan with cake release and double-line with parchment paper, ensuring the paper is 1” higher than the pan. These steps will make it easier to get the lemon bar out of the pan after baking.
- Place all the crust ingredients into a mixing bowl. Use the paddle attachment on slow until the mixture resembles breadcrumbs and starts to form into a ball.
- Tip the mixture into the pan and use your fingers to press the mixture down evenly.
- Cut a 9 x 13” rectangle of baking paper and place on top. Apply firm pressure with a cake smoother polisher to flatten the base and make it smooth.
- Remove the paper and prick the crust with a fork. Bake for 18-20 minutes until golden.
- While the crust is in the oven, clean out the mixing bowl and whisk together the flour and sugar to make the topping.
- Add the eggs, egg yolks and lemon juice and mix until combined either with a whisk or a hand blender. If using a hand blender, keep the blade under the mixture to avoid incorporating air.
- Remove the baked crust from the oven and reduce the temperature to 320°F.
- Strain the mixture into a jar and pour over the crust.
- Bake for 20-25 minutes until set. It is ready when you shake the pan, and the topping doesn’t wobble.
- Remove from the oven and allow to cool (about an hour) on a cooling rack before transferring it to the refrigerator. Refrigerate for at least 3 hours.
- When you are ready to serve, gently pull the sides of the baking paper to carefully lift it from the pan.
- Transfer to a cutting board and trim off the edges with a sharp, hot knife. Wipe it clean after every cut.
- Cut into 24 bars and dust the tops with powdered sugar.

They look great…I’ve never used a cake smoother when making mine. That looks nifty. Might have to pick one up!